Pearla 3.2 User Manual
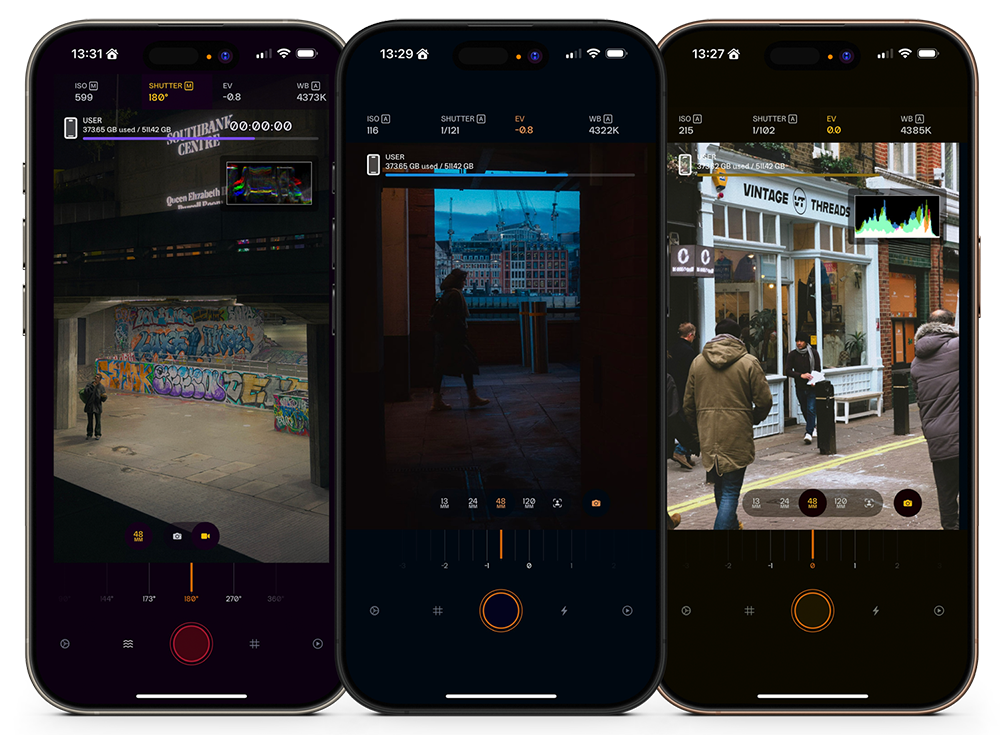
Table of Contents
Getting Started
What is Pearla?
Pearla is a professional camera app for iPhone, designed for photographers, filmmakers, and image-makers who need precise control over their tools. It brings real-time film emulation, true Log capture, full-sensor video recording, and professional colour workflows to a mobile format without compromising usability. Built for speed, quality, and intention, Pearla is a tool for serious creators who want to shape their images in-camera.
Installation & Permissions
Pearla is available to download on the iOS App Store. To function fully, it requires the following iOS permissions:
- Camera Access – To capture photos and videos.
- Microphone Access – For video recording with audio.
- Photo Library Access – To save media to the Photos app.
- Location (optional) – To attach location metadata to media. If any of the three mandatory permissions are not granted or are revoked at any point, Pearla will not function properly.
The Interface
Pearla’s interface is designed for clarity, precision, and speed. It prioritises direct access to the most critical imaging tools, while remaining flexible enough for different shooting styles and workflows. This section introduces the core elements of the user interface and how they interact.
When Pearla launches for the first time, it opens in Photo mode with Auto Exposure enabled. In portrait orientation, the user interface consists of the following elements from top to bottom:
- Toolbar – A swipeable strip across the top with camera controls.
- Viewfinder – A live preview of your composition.
- Lens Switcher – A quick-access tool to change between available lenses.
- Capture Mode Switcher – Toggle between Photo and Video capture modes.
- Main Dial – The core adjustment surface, located below the viewfinder.
- Shutter Button – For capturing photos or recording video.
- Custom Buttons – Four user-assignable shortcuts below the dial.
Pearla’s interface is adaptive. Whether you’re shooting in vertical, widescreen, or Open Gate format, the layout maximises screen space.
Toolbar
Located at the top of the screen, the toolbar provides access to Pearla’s core exposure and imaging tools. It is horizontally swipeable to reveal additional options. Tools are arranged from left to right in the following order:
- ISO
- Shutter Speed
- Exposure Compensation (EV)
- White Balance
- Tint
- Manual Focus
- Zoom Each tool can be selected with a tap. Once selected, the tool is controlled using the main dial.
Viewfinder
The viewfinder is the live preview of your scene. All controls are designed around it to ensure uninterrupted framing and composition. Pearla dynamically adjusts the viewfinder layout depending on:
- Capture Mode (Photo or Video)
- Orientation (Portrait or Landscape)
- Aspect Ratio (Standard, Widescreen, Open Gate)
Lens Switcher
At the bottom of the viewfinder, the lens switcher displays all available lenses supported by your iPhone.
Capture Mode Switcher
To the right of the lens switcher is the capture mode button. Tapping it will collapse the lens switcher and expand the capture mode switcher. This tool toggles the interface between Photo and Video capture modes. The selected mode determines available settings and interface options.
Note: Lens Blur (more on that later) is only supported in Photo Capture Mode. When it’s enabled, Pearla will turn off capture mode switching. That will be indicated visually as Pearla will hide the capture mode switcher.
Main Dial
The main dial, positioned just below the viewfinder, is Pearla’s primary control surface. It adjusts the currently selected tool’s value with high precision. The orange marker indicates the current setting. The dial is context-sensitive and updates its function based on the selected tool. At launch, the dial defaults to exposure compensation. When a manual control is selected (e.g., ISO or Shutter Speed), the dial adjusts that parameter directly.
Shutter & Custom Buttons
Below the main dial, you’ll find:
- Shutter Button – Large circular button used to capture photos or start/stop video recording.
- Four Customisable Buttons – These can be mapped to tools, toggles, or shortcuts. Custom button functions can be set independently for Photo and Video modes (see Customization).
Accessing Settings
By default, the gear icon (Custom Button C1), located to the left of the shutter button, is mapped to navigate to the Settings screen. The settings screen can also be accessed via gesture:
- Portrait orientation: swipe left to right across the viewfinder
- Landscape orientation: swipe bottom to top across the viewfinder The Settings screen is context-sensitive and adapts based on the active capture mode. Tabs will update automatically when switching between Photo and Video capture modes.
Exposure Modes
Pearla supports two primary exposure workflows:
- Auto Exposure with Exposure Compensation
- Full Manual Exposure (ISO and Shutter Speed or Angle manually controlled)
By default, Pearla launches in Auto Exposure mode. In this mode, the camera automatically adjusts ISO and shutter settings. The main dial is assigned to Exposure Compensation (EV), allowing you to adjust the scene’s brightness without switching to manual mode.
To switch to Manual Exposure, tap either the ISO or Shutter Speed/Angle tool in the toolbar. That connects the dial to the selected parameter. Once you move the dial off the ‘A’ position, Pearla locks that value manually. Pearla does not support a partial manual mode (fixing the ISO or shutter setting while the other adjusts automatically).
You can revert to auto exposure in three ways:
- Slide the dial for ISO or Shutter back to ‘A’
- Triple-tap either ISO or Shutter in the toolbar
- Select the Exposure Compensation tool (EV) and adjust the dial
To lock the current auto-detected exposure, double-tap either the ISO or the Shutter tools.
Tapping to Meter
Tapping the viewfinder when EV is selected will focus and expose for that point in the frame, fixing the values.
If any tool other than EV is active, tapping the viewfinder sets focus only.
Recalling Manual Settings
Long-pressing any exposure tool in the toolbar will recall its last manual value. That is useful when toggling between auto and a preferred manual setting. For example, when you want to shoot video at a specific shutter angle after using auto for metering.
Photo Capture Mode
Pearla’s Photo mode is designed to strike a balance between creative flexibility and technical control. Whether you’re working fully manually or relying on auto focus and exposure, the interface is structured to give you direct, responsive control over your image.
Capture Priorities
In Photo mode, Pearla offers two capture priorities: Quality and Speed. These options determine how the app balances image fidelity, responsiveness, and control at the point of capture.
When Quality is selected, Pearla uses its full image processing pipeline to render each photo. That enables higher overall image quality and supports capture resolutions of up to 48 megapixels on compatible devices. In this mode, your exposure settings serve as a target rather than an absolute; the final output will always match what you see in the viewfinder, but metadata, such as shutter speed or ISO, may be adjusted slightly to optimise the result. Quality mode is ideal when you want to prioritise rendering and fidelity, and are relying on automatic exposure.
When Speed is selected, Pearla minimises shutter delay by capturing the frame as quickly as possible using the exact exposure values dialled in by the user. This mode is required for manual exposure control. If you attempt to set ISO or shutter speed manually while capture priority is set to Quality, Pearla will automatically switch to Speed mode internally and remain there until you return to full auto exposure. In Speed mode, capture resolution is limited to 12 megapixels.
This dynamic behaviour ensures consistent operation: complete manual control always corresponds to Speed priority, while full auto exposure is required to maintain the benefits of Quality mode.
Resolution and Output Formats
Pearla gives you control over both the resolution and file format of your still image captures. When using lenses that support high-resolution output, you can choose to capture at the full 48 megapixels or downsample to 12 megapixels. Full-resolution capture is only available when Quality is selected as the capture priority. If you’re in Speed mode, whether chosen manually or automatically due to manual exposure, Pearla will limit output to 12 megapixels to preserve responsiveness and ensure minimal shutter lag.
For output format, you can choose between standard compressed formats (JPEG or HEIF) or capture both a RAW file and a compressed version simultaneously. When shooting in RAW+Compressed, Pearla saves a DNG file alongside a processed JPEG or HEIF, giving you the flexibility to work with either format depending on your workflow. The compressed file always reflects the image shown in the viewfinder at the moment of capture, including any processing or colour profile in use.
Timer
Set delay to 3, 5, 10, or 15 seconds before capture. The countdown is displayed prominently in the viewfinder.
Saving to Photos or Files
By default, Pearla saves photos to its internal Media Library. In Settings, you can enable auto-saving to the Photos app.
Video Capture Mode
Pearla’s Video mode is engineered for creators who require professional-level tools on mobile. It supports real-time Log capture, full-sensor recording, advanced stabilisation, and detailed control over shutter behaviour, frame rates, codecs, and audio.
Exposure Controls
Exposure in Video mode functions similarly to Photo mode, but there are differences in how shutter values are measured and interpreted. By default, Pearla uses shutter angle in Video mode. This system is preferred in cinematic workflows because it maintains consistent motion blur across different frame rates. Whether you’re shooting at 24, 30, or 60 frames per second, a fixed shutter angle, such as 180°, ensures a predictable, film-like look.
For users more familiar with still photography or hybrid capture, shutter speed is also available as an alternative measurement system. That may be more intuitive when transitioning from photo to video work, though it requires manual adjustment when changing frame rates to preserve motion characteristics.
You can choose your preferred system by navigating to Settings → Video and selecting the Shutter Measurement option. Pearla handles the internal conversion between units automatically, so the main dial operates consistently regardless of the measurement system.
Stabilisation
Pearla provides multiple stabilisation options, tailored to different shooting conditions and creative preferences. These can be found in the Settings → Video tab under Stabilisation.
When stabilisation is set to Off, no digital correction is applied to the footage. This setting is ideal when shooting with a tripod, gimbal, or other forms of external mechanical support, where digital correction would be redundant or counterproductive.
For handheld capture, Cinematic Stabilisation offers a balanced approach. It smooths minor motion while preserving a natural sense of handheld dynamics — perfect for walking shots or spontaneous camera movement where some motion is expected and desirable.
Pearla also includes three more aggressive stabilisation modes, labelled Static 1, Static 2, and Static 3. These modes progressively increase the level of digital correction, locking the frame more tightly and suppressing drift. They are designed for stationary capture or scenarios where the camera should appear completely locked-off, even when handheld. While effective in reducing motion, these modes may introduce visible lag or resistance during deliberate camera movement. For this reason, they are best used when the camera is handheld but intended to remain stationary.
Recording to Library, External Hard Drives or iCloud
Pearla allows you to record videos directly to a custom storage destination instead of saving them to the app’s internal Media Library. This behaviour is controlled via the Storage setting in the Settings → Video tab.
By default, Pearla saves all video recordings to its Media Library, where they can be browsed, previewed, and exported. However, when Storage is set to Files, Pearla will prompt you to select a destination folder using the iOS folder picker. You can choose a local folder on the device, a directory within iCloud Drive, or an external USB-C drive if one is connected.
When recording with this option enabled, captured videos will not appear in Pearla’s Media Library. Instead, they are saved only to the selected folder. That is ideal for professional workflows where files need to be written directly to organised project folders or to high-capacity storage devices that bypass internal space limitations.
If the selected folder becomes unavailable (for example, if an external drive is disconnected), Pearla will fall back to the media library.
Enabling ‘Save copy to Photos app’ will save a copy of the video to iOS’s Photos app.
RealHUE™ Color Calibration
RealHUE is Pearla’s color calibration system, introduced in version 3.2. It underpins the entire color pipeline for both photo and video capture and is active across all image processing modes, including Log, Film Emulation, and Custom Profiles.
RealHUE is built on hardware-specific calibration. Every supported iPhone, starting with iPhone 11, was individually measured across all available lenses and multiple lighting conditions. This process establishes a consistent color foundation for each device and focal length, ensuring that color rendering remains reliable regardless of which camera or lens is used.
The goal of RealHUE is to correct subtle but common inconsistencies in mobile color rendering. RealHUE improves tonal separation and hue stability in these situations, producing images that feel more natural, coherent, and visually balanced.
RealHUE is not a stylistic look. It does not introduce contrast curves, saturation bias, or creative interpretation. Instead, it provides a neutral and accurate starting point that improves the consistency of everything built on top of it, including film emulation profiles, custom profiles, and log capture.
RealHUE can also be selected as its own image processing mode under Settings → Image Processing. When used this way, it produces a clean, neutral result intended for applications where accuracy is the priority, such as product photography, reference capture, or color-critical work.
Even when another processing mode is selected, RealHUE remains active beneath the surface. It ensures that the color data entering Pearla’s processing pipeline is stable and consistent, which improves repeatability across shots, lenses, and devices.
RealHUE operates automatically and requires no configuration. Once enabled through the selected processing mode, it works continuously in the background for both photo and video capture.
Resolution & Frame Rate
Pearla supports a range of resolutions and frame rates, depending on your device:
- 4K UHD – Up to 60 fps on supported devices.
- Open Gate 4K – Full sensor capture; up to 30 fps.
- HD – Up to 60fps.
Open Gate mode records the entire sensor area, providing more flexibility for cropping, reframing, anamorphic captures, or delivering to multiple aspect ratios.
Frame rate options are dynamically filtered based on your device and selected resolution.
Codecs & Compression
Pearla supports a wide range of video codecs designed to suit different creative and technical requirements. The available options are hardware-dependent, and Pearla automatically filters the list to show only what your device supports, ensuring compatibility and eliminating guesswork.
For most users, the most efficient choices are HEVC (H.265) and H.264. HEVC supports 10-bit colour and offers excellent image quality at relatively small file sizes, making it ideal for mobile workflows that demand efficiency without sacrificing colour fidelity. H.264, in contrast, is an 8-bit codec. While less colour-accurate and efficient than HEVC, it remains widely supported and is useful for maximum compatibility and legacy workflows.
When using HEVC or H.264, Pearla allows you to select the encoding bitrate manually. You can choose from Low, Medium, High, or Max Quality, with each level labelled alongside its target bitrate in brackets. These target values adjust automatically based on your selected codec, resolution, and frame rate, allowing you to balance file size and image quality according to your needs.
Pearla also supports Apple ProRes on compatible devices. These high-bitrate formats are designed for professional use and are visually lossless. Depending on your iPhone model, you may see support for ProRes 422, ProRes HQ, or ProRes 4444. These options are ideal for post-production workflows involving colour grading, keying, or compositing.
On iPhone 17 Pro and 17 Pro Max, Pearla adds support for ProRes RAW recording in Open Gate 4K. This enables full-sensor readout for maximum framing flexibility in post. However, there are several hardware-imposed limitations to consider:
- Only hardware lenses are supported (e.g., 1×, 0.5×, 3×). The 2× digital crop is not available.
- Zoom functionality is disabled.
- White balance must be set manually before recording begins.
- Stabilization is disabled.
- Recording is only supported to an external storage device connected via USB-C.
ProRes RAW is intended for professional workflows that require maximum control in post-production. When enabled, Pearla automatically enforces the correct recording constraints to ensure compatibility.
Note: Pearla supports recording Open Gate 4K in H.264, but due to an iOS limitation, these files cannot be played back on the device. They must be exported to a supported computer or external system for viewing or editing. That does not affect the playback of Open Gate recordings in other codecs, such as HEVC or ProRes.
Whether you’re optimising for portability or preparing footage for advanced post, Pearla gives you complete control over how your videos are encoded.
Audio Recording
Audio settings in Pearla are available under the Settings → Audio tab, which is only visible when the app is in Video mode. This tab offers precise control over recording format, input source, monitoring preferences, and signal characteristics—making it suitable for both mobile and professional video workflows.
You can choose between two recording formats: Linear PCM, which supports both 16-bit and 32-bit depth for high-fidelity uncompressed audio, and AAC, which offers compressed recording for smaller file sizes and broad compatibility. The selected format directly affects dynamic range and editing flexibility, particularly in post-production environments.
Pearla supports various channel modes, including mono, stereo, and mono-to-stereo conversion. The duplication mode is useful when using a mono microphone but still want both channels of your video to contain the same audio signal, ensuring balance and compatibility in stereo playback environments.
The sample rate can be configured to either 44.1 kHz or 48 kHz, depending on your post-production requirements or integration with other audio systems. The 48 kHz setting is commonly used in video production to match industry standards.
A meter reference level setting is also available, which affects how the on-screen audio meters scale and respond. That does not influence the actual recorded signal but helps you interpret your input levels correctly based on your preferred metering standard.
Pearla supports manual selection of the audio input device. By default, the app uses the iPhone’s built-in microphone. However, when external sources are connected, such as a USB-C microphone, a Bluetooth microphone, or AirPods, they appear in the input list for manual selection. That is especially useful for filmmakers using Pearla as part of a rigged setup or field recording workflow.
Composition Tools
Pearla offers a set of visual guides to support precise and intentional framing without altering the final image. These tools are available in both Photo and Video capture modes and are enabled from the Settings → Guides & Grids tab.
Grids and guides are rendered in the viewfinder only. They are non-destructive and do not appear in your output. These tools are designed to support both technical accuracy and creative expression, especially when preparing content for delivery in multiple formats.
In photo capture mode, you can set Pearla to crop a photo to the selected aspect ratio. If you’re recording in Raw+Compressed format, this crop will only be applied to the compressed, processed image.
Aspect Ratio Guides
Pearla provides a curated set of aspect ratio overlays to help you compose for a variety of formats while still capturing the full sensor image. When an aspect ratio guide is enabled, the live viewfinder is masked to simulate the selected ratio; however, the underlying capture remains uncropped and retains the entire frame.
This feature is handy when planning content for specific deliverables or when visualising how the scene will adapt across different aspect ratios during editing.
The available aspect ratios include:
- 1:1 – Perfect for square compositions and social media posts like Instagram feeds.
- 4:3 – The native ratio for many sensors, commonly used in photography and video.
- 5:4 – Classic medium-format photography ratio, also useful for Open Gate compositions.
- 16:9 – Standard widescreen format for HD and UHD video.
- 2:3 – A traditional photographic aspect ratio used in 35mm film and print.
- 1.85:1 – A classic cinema widescreen standard.
- 2.39:1 – Modern cinemascope and anamorphic-style framing for filmic looks.
- 65:24 (XPan) – An ultra-wide panoramic ratio (≈2.71:1) inspired by the classic Hasselblad XPan format.
- 2:1 – A versatile cinematic ratio, often used for digital filmmaking and streaming content.
- 2.4:1 – A high-contrast, ultra-wide ratio, commonly paired with anamorphic lenses.
- 2.67:1 (8:3) – A stretched panoramic look suitable for creative or cinematic projects.
- 2.36:1 (532:225) – A slightly less extreme anamorphic frame, balancing width and height.
- 1.77:1 (133:75) – Equivalent to 16:9, with a subtle anamorphic aesthetic.
- 2.76:1 (124:45) – An ultra-wide cinematic ratio reminiscent of formats like Ultra Panavision.
These overlays allow you to plan crops or creative reframing in post-production without committing to a specific output at capture time.
Grids
Pearla includes two compositional grid systems that help refine your framing decisions in both photo and video modes.
Rule of Thirds
This grid divides the frame into a 3×3 matrix, a widely used compositional structure in photography and filmmaking. It’s beneficial for placing subjects, aligning horizons, and balancing negative space across the frame. The intersecting lines serve as guides for natural focal points, often resulting in a more visually compelling image.
Golden Spiral
Inspired by the Fibonacci sequence, the Golden Spiral grid offers a more dynamic and flowing composition. It leads the viewer’s eye through the frame in a natural curve, often used in classical art and architectural photography. In Pearla, the spiral’s orientation can be toggled between clockwise and counter-clockwise to match your subject or camera position. The Golden Spiral is particularly effective for portraiture, still life, and scenes with intentional curvature or implied motion.
Both grid types adapt automatically to the selected aspect ratio guide. They do not interfere with focus points, exposure metering, or touch interactions, ensuring a clean and intuitive composition experience.
Monitoring Tools
Monitoring settings control real-time visual aids that appear in the viewfinder during capture. These include exposure analysis overlays, audio metering, storage indicators, and viewfinder display options. They are all non-destructive and do not affect the captured media. Monitoring settings can be accessed via Settings → Monitoring, with some behaviours tailored independently for photo and video capture modes.
Focus Peaking
Focus Peaking highlights areas of strong contrast in the viewfinder to assist with manual focusing. It can be toggled on or off, and the highlight colour can be selected freely using a colour picker. That allows you to choose a colour that contrasts clearly with your scene for maximum visibility and precision.
Exposure Overlays
You can enable either a Histogram or a Waveform overlay to support real-time exposure monitoring. Both overlays are available in both photo and video capture modes, though Pearla defaults to Histogram for photo capture and Waveform for video capture. Only one overlay can be active at a time.
The Histogram displays the tonal distribution of the image, allowing you to quickly evaluate whether highlights or shadows are being clipped. The Waveform provides a spatial representation of brightness across the frame, making it easier to judge exposure consistency and lighting distribution, particularly in video scenarios. Exposure overlays can also be turned off entirely.
Pearla stores your selection independently for photo and video capture modes.
Monitor Colour Mode
This setting allows you to preview your scene in black and white without affecting the final image. Desaturating the viewfinder helps you focus on light and contrast relationships, which can be especially useful when composing in high dynamic range or flat colour profiles.
Viewfinder Mirroring
You can independently flip the viewfinder preview along the horizontal and vertical axes. That is useful when shooting with rigs, cages, or unconventional mounting setups. The flip is for preview only and does not alter the captured orientation.
Storage Overlay
This overlay displays available and used storage space for your current save location. A small icon indicates where files will be written: a hard drive icon for external SSDs, or an iPhone icon for internal storage, including Pearla’s media library, iCloud, or local folders selected via Files.
Audio Metering
When enabled, the audio meter appears in the viewfinder during video capture mode. It provides real-time feedback on input levels to support correct gain staging.
Image Processing
Available under Settings → Image Processing, this screen controls how Pearla renders your image at the point of capture. It includes real-time controls for sharpening, grain, mirroring, border styling, and selecting processing modes. Some options are specific to either photo or video capture modes, and will only appear when the relevant mode is active.
Dynamic Tone Mapping (Video Capture Mode Only)
On supported devices, a toggle for Dynamic Tone Mapping appears at the top of this screen when video capture mode is active. When enabled (default), the system dynamically adjusts tonal response as lighting changes, lifting shadows and compressing highlights on a frame-by-frame basis. Disabling this toggle prevents these automated shifts, maintaining a consistent tone curve throughout the recording. That is recommended in controlled lighting scenarios or when you need visual consistency between takes. If your device doesn’t support disabling tone mapping, this option will not be shown.
Mirror Front Camera
This toggle mirrors the output of the front-facing camera to match familiar selfie framing. It affects both the live preview and the final output, and does not apply to the rear camera.
Processing Mode
Below these toggles, you’ll find the Processing Mode selector, where you choose how Pearla renders your image in-camera. The three available modes are:
- Film Emulation — Applies one of Pearla’s built-in film profiles.
- Custom Profile — Uses a user-defined look derived from any built-in profile, including the neutral Standard profile.
- Log — Outputs a flat gamma curve suitable for post-production grading, or an image with a LUT applied, depending on Log settings configured separately. Only one mode can be active at a time. Your selection is stored independently for photo and video capture modes and determines which controls are visible within this screen. Each processing mode is covered in its section of the manual.
Sharpening
Use the sharpening control to adjust the crispness or softness of your image. Setting it to 0 applies a neutral level of detail. Reducing it to -1 gives a softer, more forgiving look. Increasing it to +1 results in sharper edges and more definition. This adjustment is available in both capture modes and affects the saved output.
Grain
Pearla can add a film-like grain effect to your image in real-time. Grain Strength controls how visible the grain is, while Grain Size determines the texture’s coarseness. Grain is baked into the final output and is available in all processing modes. Custom Profiles can have their own grain settings and override grain settings set on the Image Processing tab.
Border (Photo Capture Mode)
In photo capture mode, Pearla lets you apply a visible border directly to the saved image. You can use a colour picker to set the border to any colour, and choose from three thickness presets: Thin, Medium, or Thick. This border only applies to the processed output and does not affect any RAW file saved alongside it.
Anamorphic & External Output
Pearla offers full-featured anamorphic support for both horizontal and vertical workflows, along with clean HDMI output for professional monitoring and recording setups. These controls are designed for cinematographers and photographers working with anamorphic lenses and external rigs.
All anamorphic-related controls are found under Settings → Anamorphic, available in both photo and video capture modes. HDMI output settings are located in Settings → HDMI, which appears only when video capture mode is enabled.
Monitor Anamorphic
When this toggle is enabled, Pearla applies real-time de-squeeze to the viewfinder image, reflecting the selected anamorphic squeeze factor. That ensures accurate composition when using horizontally or vertically oriented anamorphic lenses. This preview correction does not affect the recorded media unless the recording toggle is also enabled.
Record Anamorphic
When enabled, the selected de-squeeze factor is baked into the final output, useful when you want ready-to-use media. When disabled, the image retains its native look from the lens, giving you complete control in post-production. These toggles are available in both photo and video capture modes.
De-Squeeze Factors
Pearla supports a wide range of squeeze factors to match both modern and legacy anamorphic optics:
Standard (Horizontal) Squeeze Ratios:
- 1.25×
- 1.33×
- 1.5×
- 1.55×
- 1.6×
- 1.65×
- 1.8×
- 2.0×
Vertical (Reciprocal) Desqueeze Ratios:
- 0.8 (1.25× equivalent)
- 0.75 (1.33× equivalent)
- 0.667 (1.5× equivalent)
- 0.645 (1.55× equivalent)
- 0.625 (1.6× equivalent)
- 0.606 (1.65× equivalent)
- 0.556 (1.8× equivalent)
- 0.5 (2.0× equivalent)
These ratios apply to both monitoring and recording paths when the respective toggles are active.
Vertical Anamorphic (Vertiscope)
Pearla is the only camera app that fully supports vertical anamorphic workflows. When using an anamorphic lens mounted in portrait orientation, the optical squeeze is applied along the vertical axis, adapting the viewfinder and overlays accordingly. That enables unique portrait-format anamorphic shooting for cinematic vertical delivery. When combined with Pearla’s aspect ratio guides, vertical de-squeeze unlocks a powerful creative workflow for social media, editorial, and experimental formats.
Aspect Ratio Cropping with Anamorphic
In photo capture mode, Pearla allows you to combine anamorphic de-squeeze with aspect ratio cropping via the Grids and Guides screen. That enables compositions that are not possible in any other app. For example, capturing with a 1.33× anamorphic lens, applying in-camera de-squeeze, and then cropping to an XPan aspect ratio to create wide-format stills with genuine optical character.
This hybrid approach makes Pearla uniquely suited for photographers who want to explore cinematic aesthetics in still images.
Clean HDMI Output
Clean HDMI output can be enabled under Settings → HDMI (video capture mode only). When active, Pearla sends a clean video signal to external monitors or capture devices. UI elements and touch indicators are excluded, while all active preview transformations, including anamorphic de-squeeze, are preserved.
This is ideal for professional monitoring on set, wireless director’s monitors, or live feeds.
Media Library
Pearla’s Media Library stores all captured media unless you’ve chosen to save files elsewhere. It’s designed for fast review and reliable export.
You can access the Media Library in two ways. Tap the C4 button (assigned by default to open the library) located to the far right of the shutter button. Alternatively, swipe across the viewfinder from right to left in portrait orientation or from top to bottom in landscape orientation.
The Media Library is fully integrated into the capture interface, providing seamless access without requiring users to leave the app.
Interface
The library is divided into two tabs: Photos and Videos. The Photos tab displays processed stills. If you capture in RAW+Processed mode, the corresponding RAW file is stored invisibly and exported alongside the processed version. The Videos tab contains all recorded clips. When viewing media, you can swipe left or right to navigate, pinch to zoom and inspect details, and use the scrub bar at the bottom for quick scrolling through extensive collections.
Tapping Select enters multi-selection mode, where you can export selected files or delete them from the library. Export options include saving to the iOS Photos app or exporting directly to a folder using the Files interface, which supports internal storage, iCloud Drive, and connected external drives.
In RAW+Processed mode, Pearla automatically exports both files as a matched pair, with aligned filenames.
File Naming & Organisation
Custom naming options are available under Settings → Media. You can define a camera name (used as a prefix), enable timestamping, and use an auto-incrementing counter per media type. A live preview of the following filename is shown in the settings.
Changing the camera name resets the counter, making it ideal for project-based workflows or reel tracking. This system is designed to maintain production continuity and organise post-processing, especially in multi-camera environments.
Example: CAM_A_20250727_0012.MOV
Save to Photos App
Under Settings → Media, you’ll find a section labelled Save Copy to Photos App, which mirrors the toggles available in the Photo and Video settings tabs. These two toggles, one for photos and one for videos, enable the automatic saving of captures to the iOS Photos app, in addition to Pearla’s internal library.
This central view provides a quick way to check and control auto-save status across both capture modes, regardless of which one is currently active.
Customisation
Pearla’s customisation tools let you adapt the interface to your workflow. Whether you’re optimising for fast access to tools or adjusting visual preferences, you’ll find everything under Settings → Customisation.
Themes
Pearla offers three visual styles: Golden Pearl, Blue Tide, and Deep Amethyst, each providing a distinct colour palette. These themes affect the interface only and do not affect your final images. They’re designed purely for visual clarity and shooting comfort.
App Icon
From the same screen, you can also select one of several alternate app icons. That is a visual preference only and does not affect how Pearla functions.
Custom Buttons (C1–C4)
In line with the shutter button and just below the viewfinder, Pearla includes four customisable buttons. C1 and C2 are to the left of the shutter; C3 and C4 are to the right. Each button can be assigned a shortcut, and these assignments are specific to the current capture mode.
In photo capture mode, available assignments include toggling grids, guides, aspect ratio overlays, histogram or waveform display, flash, or the photo border. You can also access the Media Library, open the Settings screen, enable or disable the on-screen storage indicator, or toggle Lens Blur.
In video capture mode, available assignments include all the same tools except for flash and the photo border, which are not available. Additional options include toggling audio metering and enabling orientation lock. Histogram and waveform overlays are supported in both capture modes.
By default, the following assignments are set: Photo mode:
- C1 – Settings
- C2 – Grids
- C3 – Flash
- C4 – Media
Video mode:
- C1 – Settings
- C2 – Exposure Overlay (Waveform by default)
- C3 – Grids
- C4 – Media
Note: Lens Blur is exclusive to photo capture mode. When it’s enabled, regardless of whether it’s activated via shortcut, toolbar, or settings, the capture mode selector is hidden. To switch to video capture mode, Lens Blur must be disabled first.
Accessing Settings and the Media Library via Gestures
Even if none of the custom buttons are mapped to the Settings screen or Media Library, you can access both via gesture. Swipe left to right across the viewfinder in portrait orientation (or bottom to top in landscape) to open the Settings screen. Swipe right to left in portrait (or top to bottom in landscape) to enter the Media Library. These gestures ensure key screens are always reachable.
Support & Feedback
Pearla includes built-in support resources and a streamlined feedback mechanism, enabling you to resolve issues quickly and stay up to date with the latest documentation. All support options are located under Settings → Support.
User Manual & Troubleshooting
Pearla links directly to two key support resources: User Manual – Opens the official Pearla manual (this document) in your default browser Troubleshooting – Opens a curated, frequently updated list of common questions, edge cases, and known issues These resources are regularly maintained to reflect the latest app version and include practical guidance for common workflows and corner cases.
Video Tutorials
A link to Pearla’s YouTube tutorials is also available. These videos demonstrate real-world usage, feature walkthroughs, and example workflows across various creative disciplines. The video library complements the manual and is ideal for users who prefer visual learning or want to see specific tools demonstrated in context.
Customer Feedback
For direct support, Pearla includes a built-in feedback option. Tapping it opens your default email app with a new message addressed to the support team. The message is automatically populated with diagnostic information, including your device model, iOS version, Pearla’s build number, and all current app settings. That allows the team to provide accurate assistance without requiring back-and-forth for technical context. You can review, edit, or remove any of this information before sending.
Social & Community
Shortcuts to Pearla’s official social channels are provided for users who wish to follow development updates, view featured creator work, or engage with the broader user community. These links are informational only. Technical support is handled exclusively through the feedback email system.
Lens Blur Mode
Lens Blur is Pearla’s simulated depth-of-field system for photo capture. It’s designed for portraiture, where background separation and soft focus can enhance the subject’s presence in the frame. This mode replicates the visual characteristics of wide-aperture lenses, allowing users to create aesthetically shallow depth-of-field images even when shooting with more compact optics or in conditions with limited available light. Lens Blur can be enabled from Settings → Lens Blur, where you will find all relevant configuration options. Alternatively, it can be toggled using a custom button if mapped via Settings → Customisation.
Functional Overview
When enabled, Pearla applies a simulated blur and bokeh effect to the background while preserving clarity around detected subjects. That creates an image with an artificially narrow depth of field, giving portraits a more intentional, focused look. The effect is applied during capture and is baked into the saved image.
Limitations
While Lens Blur enhances creative control, it introduces a few significant constraints. Resolution is limited to 12 megapixels regardless of the selected output setting or device capability. When this mode is active, RAW+Compressed capture is disabled, and only compressed output will be saved. The capture mode switcher is also hidden while Lens Blur is on, meaning you’ll need to disable the feature before switching to video capture mode. Depending on the device and conditions, some lens combinations may be temporarily unavailable. These limitations are indicated in the interface while the mode is active.
Aperture Simulation
The simulated aperture setting governs the appearance of the blur, available in Settings → Lens Blur. Lower values, such as f/1.4 , simulate a shallower depth of field with more pronounced background blur, while higher values, like f/5.6 , reduce the effect. That is a purely visual transformation and has no impact on exposure or light intake.
Film Emulation
Film Emulation is one of Pearla’s three image processing modes. It applies a colour and tone transformation at the point of capture, using one of Pearla’s built-in film profiles. These transformations are rendered directly from sensor data and embedded into the final output, providing a completed visual style with no need for post-production.
Unlike a filter or LUT applied after the fact, Film Emulation is part of Pearla’s real-time image processing pipeline.
To activate Film Emulation, navigate to Settings → Image Processing, set Processing Mode to Film Emulation, then tap the Film Emulation tab to choose your profile.
Live Preview and In-Camera Rendering
Once Film Emulation is enabled, the selected look is visible in the live viewfinder as you compose your image. The same look is applied to the captured media — what you see is what you get.
This consistency makes it ideal for users who want a stylised, ready-to-publish aesthetic without building a colour grading pipeline in post.
Profile Design
Each profile in Pearla’s library is meticulously crafted to emulate the unique feel of a specific film stock or creative style. These looks are calibrated for mobile sensors, with special attention given to highlight roll-off, skin tones, contrast distribution, and colour fidelity across varying lighting conditions.
Visual qualities vary from subtle tonal shifts to dramatic reinterpretations of the scene, with differences in saturation, grain, and dynamic response.
Available Profiles
Pearla includes the following built-in film profiles:
- Standard – Neutral colour, balanced contrast, no strong aesthetic bias.
- Chroma Solaris – Warm, nostalgic.
- Achromia – Muted, moody tones.
- LDN 1992 – Experimental; stretched tones and colour shifts.
- Visage - Portrait-optimised; skin tone preservation and low midtone contrast.
- Visage Umbra – Adds density in shadows; subtle highlight roll-off for tricky light.
- Afthonos – Bold, high-saturation; inspired by slide film, suited for nature and sunsets.
- Classic Neg – Softened colours and contrast; nostalgic, without harshness.
- Classic Chrome – Desaturated reds, strong shadows; documentary and editorial feel.
- Solara – Balanced black-and-white, modelled after Ilford HP5.
- Solara Urbanis – Higher contrast monochrome with lifted red sensitivity; ideal for architecture.
- Solara Visage – Monochrome with softer highlight treatment for flattering portraits.
When to Use
Film Emulations are designed for creators who prefer to finalise their visual look in-camera. It’s ideal for fast workflows, social sharing, or professional delivery scenarios where the captured look should remain intact. It also ensures visual consistency across a shoot without requiring LUTs, presets, or software pipelines.
Custom Film Emulation Profiles
Custom Profile is Pearla’s most advanced in-camera styling mode. It expands the built-in film emulation pipeline with powerful creative modifiers—letting you design completely new looks from any of Pearla’s film profiles and store them for fast access. Each custom profile starts with a film emulation base, including the neutral Standard profile, and can be extensively modified to suit your needs.
Custom profiles are available in both photo and video capture modes. To enable, go to Settings → Image Processing, set Processing Mode → Custom Profile, then tap the Film Emulation II tab to view, create, import, or edit your profiles.
Creating a Custom Profile
To start a new profile, tap ‘Create New’ in the Film Emulation II tab. The editor allows you to assign a name and choose a film emulation base directly within the editing screen. Once selected, you’ll have access to Pearla’s full customisation toolset.
Tone Modifiers
The Shadows and Highlights controls adjust the global tone curve—use them to shape overall contrast and tonal roll-off. The Midtone Detail slider controls local contrast in the midtones. Lower values reduce surface texture and smooth the skin; higher values add definition and microcontrast, which is useful for stylised portraits or textured scenes.
Colour Modifiers
Pearla uses a subtractive saturation model that deepens colour density without boosting luminance, preserving highlight detail and avoiding the harshness of digital saturation curves. Vibrance works selectively, enhancing muted tones while protecting already saturated areas, particularly in the skin.
The Colour Balance sliders allow subtle shifts in colour tint across red-cyan, green-magenta, and blue-yellow channels. These controls are ideal for sculpting mood or matching a visual reference.
Texture & Effects
Grain adds film-like texture with adjustable strength and size. Grain is rendered in-camera and baked into the final image or video. Bloom introduces soft glow in bright regions, replicating the optical diffusion seen in older lenses or vintage glass. It affects highlight regions only and does not simulate halation.
Saving, Deleting, and Managing Profiles
After customising your profile, tap Save. It will appear in the Film Emulation II tab and remain active whenever Processing Mode → Custom Profile is selected.
To delete a profile, tap it in the Film Emulation II tab to open the editor, then use the delete button at the bottom of the screen. Pearla also supports importing and exporting custom profiles. This allows you to share your own looks, install downloadable recipes from House of Mars, or load matched styles across devices. Tap the Import/Export button in the Film Emulation II tab to manage profiles stored as .pprof files. Exported profiles include all tone, color, and texture settings, along with the associated film emulation base.
Log Mode
Log mode is Pearla’s most advanced image processing option, offering maximum dynamic range and designed specifically for professional colour grading workflows. It produces a flat, desaturated image that retains extensive highlight and shadow detail, ideal for use in post-production environments.
To enable Log mode, go to Settings → Image Processing and set Processing Mode to Log. Once enabled, all settings under Settings → Log will take effect for both photo and video capture modes.
Pearl-Log
At the core of Pearla’s Log workflow is Pearl-Log, a true log gamma curve designed to deliver extended dynamic range with smooth highlight roll-off and shadow detail retention. Pearl-Log is consistent across all supported devices (including iPhone devices that don’t support Apple Log), making it suitable for multi-camera environments and professional pipelines.
Colour Space Transforms
Pearla allows you to apply live colour space transforms to Pearl-Log in-camera. That enables you to match the tonal characteristics of footage from other cameras, align with industry-standard workflows, or simply preview your final look while shooting.
Supported targets:
- Pearl-Log / Rec.2020
- Sony S-Log3 / S-Gamut3.Cine
- Nikon N-Log (Rec.2020)
- Blackmagic Design Film Gen 5
- ARRI LogC3 / ARRI Wide Gamut 3
- Canon C-Log3 / Cinema Gamut
- DJI D-Log / D-Gamut
- FujiFilm F-Log / Rec.2020
- FujiFilm F-Log2 / Rec.2020
- Sony S-Log2 / S-Gamut
- Panasonic V-Log / V-Gamut
Log Monitoring
The Log Monitoring option, located in Settings → Log, controls how the image appears in the viewfinder and external HDMI output during capture. There are three monitoring options:
- Log shows the flat Pearl-Log signal with no contrast or colour correction.
- Gamma Assist applies a Rec.709 contrast preview to help with exposure and framing.
- LUT mode lets you monitor using a selected LUT. When this mode is active, Pearla reveals your stored LUTs and an “Apply LUT to Image " toggle. If this toggle is off, the LUT only affects the preview and HDMI output. If it’s on, the LUT is applied to the final photo or video at capture.
LUT Support
Pearla supports .cube LUTs in all standard configurations. You can import LUTs, rename them, and store them for future use. When Log Monitoring is set to LUT, these LUTs become available for both monitoring and capture.
That allows for an entirely in-camera workflow if desired, which is ideal when working with predefined looks or a visual language that must remain consistent across projects.
Log Photography
Pearla is the only iPhone camera app that supports full-resolution log photo capture with or without a LUT applied.
When ‘Apply LUT to Image’ is off, your photos are captured in your chosen log colour space, ready for advanced colour grading on the desktop. That is ideal for photographers who want to build a precise grade in post and maintain complete control over colour and tone.
When ‘Apply LUT to Image’ is on, the selected LUT is baked into the final photo at capture. This workflow enables you to capture log photos that already match your intended final look, ideal for fast delivery, social sharing, or working with client-approved LUTs.